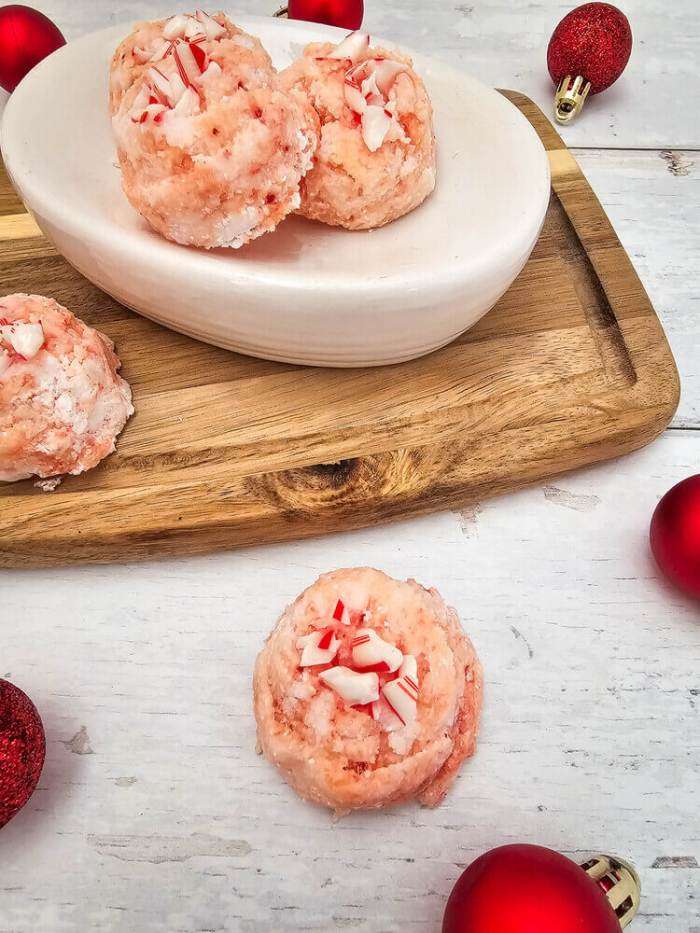
Who doesn’t love the idea of turning a simple shower into a spa-like escape? That’s where Candy Cane Shower Bombs DIY comes in. These little wonders fizz and release soothing scents, transforming your daily routine into a moment of bliss.
Making them yourself is easy and fun, plus you get to customize the scents and ingredients to suit your mood or needs. DIY shower bombs are all the rage for good reason—they’re affordable, creative, and make perfect gifts. Ready to fill your bathroom with delightful aromas?

Our DIY Bath and Beauty category is one of the most popular on this site. We have an entire collection of simple recipes that are perfect for the beginner. Browse our curated Amazon list to shop for many of the supplies that we use in our products.
Benefits of Using Shower Bombs
Transforming your shower into a sensory retreat is easier than you think. Shower bombs, with their effervescent fizz and delightful scents, are a game-changer in daily self-care routines. Their appeal goes beyond just fragrance; they bring a host of benefits right into your bathroom.
Aromatherapy Benefits
Essential oils in shower bombs offer more than just pleasant scents. They serve as a form of aromatherapy, which can uplift your mood and calm your senses. Different oils cater to different needs:
By choosing different oils, you can customize your shower experience to suit your mood. Who knew that a simple shower could turn into a personal spa session?
Skin Benefits
Beyond the fragrant allure, shower bombs are also a treat for your skin. Packed with nourishing ingredients, they can enhance skin health:
- Baking Soda: Acts as a gentle exfoliant, helping to remove dead skin cells and leaving your skin feeling fresh and smooth.
- Epsom Salts: Known for soothing sore muscles, they also help to detoxify the skin, leaving it soft and supple.
- Oils and Butters: Ingredients like coconut oil or shea butter can add moisture, ensuring your skin stays hydrated and nourished.
- Essential Oils: Apart from their aromatic benefits, many essential oils also have antibacterial and anti-inflammatory properties, promoting healthier skin.
Using a shower bomb is like giving your skin a mini spa treatment, adding a layer of luxury to your everyday routine. With all these benefits, it’s no wonder shower bombs have become a staple in many homes.
How to Store Shower Bombs
Once you’ve crafted your delightful shower bombs, the next step is ensuring they stay fresh and effective. Proper storage is key to keeping them working their magic. Let’s explore the best ways to store your creations.
Ideal Storage Conditions
Your shower bombs are like little sponges, soaking up moisture from the air. To keep them in perfect fizzing condition, store them in a cool, dry place. Think of it like keeping a delicate flower fresh—a little care goes a long way.
- Temperature: Aim for room temperature, around 68°F to 77°F (20°C to 25°C). Extreme temperatures, hot or cold, can affect their potency and texture.
- Humidity: High humidity is a no-go. Keep the humidity level below 50% to avoid premature fizzing or loss of essential oil scent.
Keeping your shower bombs away from heat sources like radiators or sunny windowsills will also help maintain their integrity.
Containers to Use
Choosing the right container can make all the difference in preserving your shower bombs’ freshness. It’s like picking the perfect jacket to keep you warm and dry.
- Glass Jars: An airtight glass jar with a lid is ideal. It offers a clear view of your colorful creations while keeping them sealed from the air.
- Metal Tins: These are stylish and functional, perfect for gifting as well. Just ensure the lid fits snugly to keep moisture out.
- Plastic Containers: Opt for BPA-free plastic containers with secure lids. They’re lightweight and often stackable, saving you space.
- Resealable Bags: For a quick and easy solution, use high-quality resealable bags. They offer a tight seal, plus they’re easy to store in a drawer or cabinet.
If you’ve got a collection of different scents, consider storing each scent separately to avoid mixing aromas. This way, each shower bomb retains its unique personality, ready to transform your shower into a fragrant escape whenever you need it.

Tips and Tricks for Making Shower Bombs
Crafting your own shower bombs can be a delightful experience, but there are a few tricks to getting them just right. These tips will help you create perfect fizzing treats every time. Whether you’re a seasoned DIY-er or a newbie, these insights can elevate your shower bomb game to new heights.
Common Mistakes to Avoid
Creating shower bombs might seem straightforward, but a few common pitfalls can affect their effectiveness. Here’s what to watch out for:
- Too Much Moisture: Adding too much water can trigger premature fizzing. Aim for a consistency like wet sand. This ensures your shower bombs keep their shape and fizz at just the right moment.
- Incorrect Ratios: Measure your ingredients carefully. A balance between baking soda and citric acid is crucial for the perfect fizz. If they’re out of whack, you might end up with a dud.
- Rushing the Drying Process: Patience is key. Let them dry for at least 24 hours. If they’re not fully dry, they might crumble or not fizz properly.
- Overmixing Colorants: It’s tempting to blend colors evenly, but overmixing can cause uneven textures. Gently fold colors in for a marbled effect.
- Ignoring Air Exposure: Humidity is the enemy. Store your shower bombs in an airtight container to prevent them from absorbing moisture and losing their fizz.

FAQs About Shower Bombs
Curious about shower bombs and how they work? You’re not alone. These fizzy wonders can turn a regular shower into a fragrant escape, but you might have a few questions. Let’s answer some common queries to help you enjoy your DIY shower bombs to the fullest.
Can shower bombs be used daily?
You might wonder if it’s okay to use a shower bomb every day. The answer is yes, with a few considerations. Shower bombs are generally safe for daily use, but it’s essential to think about the ingredients. If your skin tends to be sensitive or if you have allergies, you might want to limit usage to every other day, just to be cautious.
Most people find that using a shower bomb daily adds a bit of luxury to their routine without any issues. Here are some pointers to keep in mind:
- Variety of scents: Switching up scents can enhance your shower experience and keep it interesting.
- Watch for irritation: If you notice any skin irritation, take a break and see if it improves.
- Balance: Consider alternating with days of regular showers to maintain a healthy balance.
Are shower bombs safe for all skin types?
Safety is always a priority, especially when it comes to skin care. Shower bombs are usually safe for most skin types, but here are a few things to consider:
Patch test: Trying a patch test is always a good idea. Apply a small amount of the bomb to a patch of skin before using it in the shower. This helps to ensure there won’t be adverse reactions.
Sensitive skin: If your skin is sensitive, opt for shower bombs with mild essential oils like chamomile or lavender. They are less likely to cause irritation.
Allergies: Check the ingredients for any potential allergens. This is crucial if you have known allergies to certain essential oils or other components.
DIY Shower Bomb Recipe
Imagine stepping into a shower that feels like a luxurious spa. Shower bombs can do just that by filling your bathroom with calming scents. They’re simple to make at home, and you can choose your favorite fragrances. Plus, these DIY creations are a hit as homemade gifts.
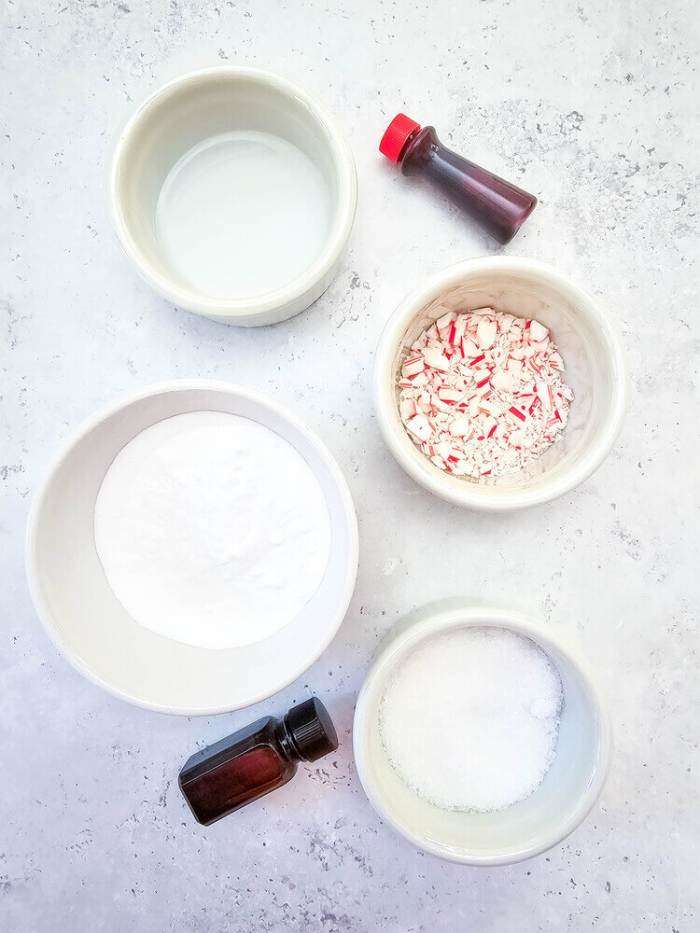
Supplies
- Baking soda
- Epsom salts
- Water
- Peppermint essential oil
- Red food coloring
- Cookie scoop
How to Make Candy Cane Shower Bomb
In a small bowl, mix the baking soda with half the Epsom salts until combined.
Add essential oil and water, stirring until it feels like wet sand. You might not need all the water.
In a disposable cup, combine the rest of the Epsom salts with a drop of red food coloring. Gently fold this into the first mixture without fully mixing it.
Use a cookie scoop to take portions and drop them onto parchment paper.
Let it sit for 12 hours.

More Recipes You Will Like
- DIY Vaporizing Shower Bombs
- Easy DIY Milk Bath Bombs
- Peppermint and Green Tea Bath Bombs
- DIY Shower Steamers for Clarity
- Calming Lavender Shower Melts

Candy Cane Shower Bombs DIY
Equipment
- Cookie scoop
Materials
- ½ cup baking soda
- ¼ cup epsom salts
- 2-3 tsp water
- 20 drops peppermint essential oil
- 1 drop red food coloring
Instructions
- In a small bowl, whisk together the baking soda, and half the epsom salts until well blended.
- Add the essential oil and water, and stir until it is the consistency of wet sand. You may not use all the water.
- In a disposable cup, mix the remaining half of the epsom salts with one drop of red food coloring. Fold into the other mixture, not completely blending it.
- Using the cookie scoop, gather spoonfuls, and drop onto parchment paper.
- Allow to set for 12 hours.