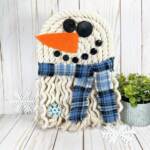
Snowman Rope Craft
Materials
- Cotton Rope 6.8ft. – Dollar Store
- Cardboard – Recycled
- Glue Gun and Glue Sticks – Dollar Store
- Natural Jute Twine – Dollar Store
- Buttons Black – Dollar Store
- Fabric Plaid – Dollar Store
- Wooden Snowflake – Dollar Store
- Craft Felt – Orange
- Acrylic Craft Paint – Light Blue
- Paintbrush
- Scissors
- Ruler
- Pencil
- ROPE SNOWMAN PATTERNS
Instructions
STEP ONE
- Gather all supplies. Download, print and cut out the ROPE SNOWMAN BASE PATTERN. Trace the semi-circle pattern onto cardboard with a pencil.
STEP TWO
- Cut out the semi-circle Rope Snowman base pattern with scissors. The rope is pretty heavy, so corrugated cardboard makes the best base. This size snowman will require 2 packages of cotton nautical rope.
STEP THREE
- Dry fit the rope around the base, and using a ruler, measure 12” from the top of the snowman to the bottom.
STEP FOUR
- Trim the first section of rope with scissors. Attach the rope to the carboard base using a glue gun and glue sticks. If using liquid craft glue, please allow additional time for drying.
STEP FIVE
- Dry fit the next section of rope. Attach with a glue gun and glue sticks. Trim the cotton rope with scissors.
STEP SIX
- Continue adding additional sections of rope. Securing with a glue gun and glue sticks.
STEP SEVEN
- Lay the snowman flat on your work surface and using scissors, trim the ends as even as possible.
STEP EIGHT
- Unravel each section of rope by hand, leaving the lengths curly.
STEP NINE
- Give the ends of the cotton rope a final trim with scissors.
STEP TEN
- Using scissors, cut out a carrot shape from orange craft felt. Colored cardstock, heavy fabric, or craft foam would work for this project as well.
STEP ELEVEN
- Select 2 large black buttons for the snowman eyes and 6 medium black buttons for the mouth. Attach the buttons and carrot nose with a glue gun and glue stick.
STEP TWELVE
- Snip and rip plaid fabric into two strips that are approximately 2” wide by 18” long. Cut into the edge of the fabric ½” with scissors, then tear the fabric into strips. This will produce a frayed edge.
STEP THIRTEEN
- Glue the 2 short ends of the fabric strips together to create one 36” length of fabric which will become the snowman’s scarf.
STEP FOURTEEN
- Wrap with the plaid fabric around the snowman’s neck, securing with a glue gun and glue sticks. Trim any long ends of fabric with scissors.
STEP FIFTEEN
- Basecoat a small wooden snowflake with light blue acrylic craft paint. Let dry, and apply a second coat, if necessary.
STEP SIXTEEN
- Attach the wooden snowflake to the snowman’s body with a glue gun and glue sticks.
STEP SEVENTEEN
- To finish, measure a 12” length of natural jute twine and cut with scissors. Flip the snowman over and attach the jute twine hanger to the cardboard with a glue gun and glue sticks.