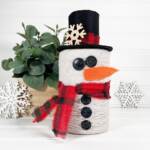
Easy Snowman String Ball Craft
Materials
- Cotton String 2 Balls – Dollar Store
- Craft Felt Black, Orange
- Toilet Paper Tube Recycled
- Fabric Plaid Dollar Store
- Black Buttons Dollar Store
- Wooden Snowflakes Dollar Store
- Glue Gun and Glue Sticks Dollar Store
- Straight Pins
- Scissors
- Pencil
- White Chalk Pencil
- Ruler
- COTTON STRING BALL SNOWMAN PATTERNS
Instructions
STEP ONE
- Gather all supplies. Unwrap the balls of string and remove the paper labels. Stack the balls on top of each other and secure with a glue gun and glue sticks.
STEP TWO
- Measure a 2” long section from the cardboard toilet paper tube, then cut it out using scissors.
STEP THREE
- Measure a 2” wide by 9” long rectangle on black craft felt with a white chalk pencil. Cut out with scissors.
STEP FOUR
- Download and print the SNOWMAN PATTERNS, layer the larger circle hat brim onto black craft felt and cut out with scissors.
STEP FIVE
- Layer the smaller circle hat top onto black craft felt and cut out with scissors. Secure the patterns with straight pins or trace the patterns with a while chalk pencil.
STEP SIX
- Attach the black craft felt pieces to the sides, bottom and top of the cardboard toilet paper tube with a glue gun and glue sticks.
STEP SEVEN
- Using scissors, cut out a carrot shape from orange craft felt. Colored cardstock, heavy fabric, or craft foam would work for this project as well.
STEP EIGHT
- Select 2 medium black buttons for the snowman eyes and 3 small black buttons for the front buttons. Attach the buttons and carrot nose with a glue gun and glue sticks. If using liquid craft glue, please allow additional time for drying.
STEP NINE
- Snip and rip plaid fabric into two strips. The first approximately 1” wide by 12” long, and the second ½” wide by 8” long. Cut into the fabric ½” with scissors, the tear the fabric to create strips. This will produce a frayed edge.
STEP TEN
- Tie the larger strip of fabric around the snowman’s neck as the scarf, then trim any long ends with scissors.
STEP ELEVEN
- Secure the smaller strip of fabric around the base of the hat as the band, using a glue gun and glue sticks.
STEP TWELVE
- To finish, glue a small wooden snowflake to the snowman’s hat.