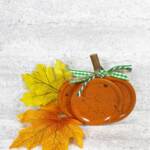
DIY Mason Jar Lid Pumpkin
Materials
- Metal Canning Jar Lids – Dollar Store
- Spray Paint – Orange
- Ribbon, Twine and Trim Scraps – Assorted Greens
- Glue Gun and Glue Sticks – Dollar Store
- Wood Stems – Dollar Store
- Tumbling Tower Game Pieces – Dollar Store
- Acrylic Craft Paint - Brown
- Paintbrush
- Scissors
- Ruler
Instructions
STEP ONE
- Gather all supplies. In a well ventilated are (or outside) coat the metal canning jar lids with orange spray paint. Use several light layers instead of one heavy layer of paint. Set aside to dry. You will need three (3) lids for each pumpkin.
STEP TWO
- Once dry, position three of the canning jar lids to create a pumpkin shape. Remove the top lid and attach the bottom two lids together with a glue gun and glue sticks. Hold in place until glue cools completely.
- NOTE: You can use liquid craft glue for this project, but you will have to wait for it to dry.
STEP THREE
- Attach the third canning jar lid to the top center of the previous two lids with a glue gun and glue sticks. Hold in place until glue cools completely.
STEP FOUR
- Protect your work surface with a paper towel, dip a paint brush in brown acrylic craft paint and water, then flick on the surface of the pumpkin to create a splatter effect. Set aside to dry.
STEP FIVE
- Once dry, flip the pumpkin over and attach a wooden stem to the top center with a glue gun and glue sticks.
STEP SIX
- Glue together two tumbling tower wooden game pieces for each pumpkin to create a stand. Attach the stand to the back bottom center of the pumpkin with a glue gun and glue sticks. Hold in place until glue cools completely.
STEP SEVEN
- Measure and cut assorted green ribbons, twine, and trims into six-inch sections. Tie the assorted trims in a knot to create a leaf bundle for your pumpkins.
STEP EIGHT
- To finish, attach the ribbons to the front center of the wooden stem with a glue gun and glue sticks.