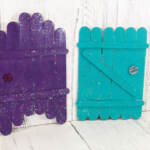
STEP ONE: Gather all supplies. To create the purple fairy door, line up six jumbo craft sticks on your work surface in a graduated pattern. Attach the jumbo craft sticks together by gluing two regular crafts sticks horizontally at the top and bottom.
To create the blue fairy door, line up six jumbo craft sticks on your work surface in a rectangular pattern. Using a glue gun and glue sticks, attach three regular craft sticks in a “Z” pattern.
STEP TWO: Paint the first fairy door with purple acrylic craft paint. Paint the second fairy door with blue acrylic craft paint. Set aside to dry and apply a second coat, if necessary.
STEP THREE: Once dry, apply a topcoat of iridescent glitter acrylic craft paint to both fairy doors. Set aside to dry and apply a second coat, if necessary. Use liquid craft glue and loose glitter or glitter glue, instead of the glitter acrylic paint.
STEP FOUR: After the glitter paint has dried, attach a button doorknob to each fairy door with a glue gun and glue sticks. You can use liquid craft glue for this project, but you will have to wait for it to dry.