
I have finally dusted off my Cricut machine, and started creating! I’ve been enjoying making projects, and this You Are My Anchor Sign – Cricut craft is my favorite so far. I made it for my cousin in law and her fiance for their boat that they spend a lot of time on during the summer months. Follow the directions below to make this Cricut craft with FREE svg file!

This is such an easy project to make, yet makes an absolutely beautiful decorative statement piece. You will need a piece of wood and some rope, which you can either purchase at your local home improvement store, or you could use scrap wood and recycled rope. Of course, you could stain the wood, or even paint it to match your home’s decor as well.
I’ve got many more Cricut crafts coming, so make sure to stop back and check them out. I will update this post with links to more, as I publish too.

You Are My Anchor Sign – Cricut Craft
Follow the instructions below to complete this project, and scroll to the bottom of this post to download the “You Are My Anchor” free svg file. You can get even more designs to work with when you sign up for a Cricut Access subscription!
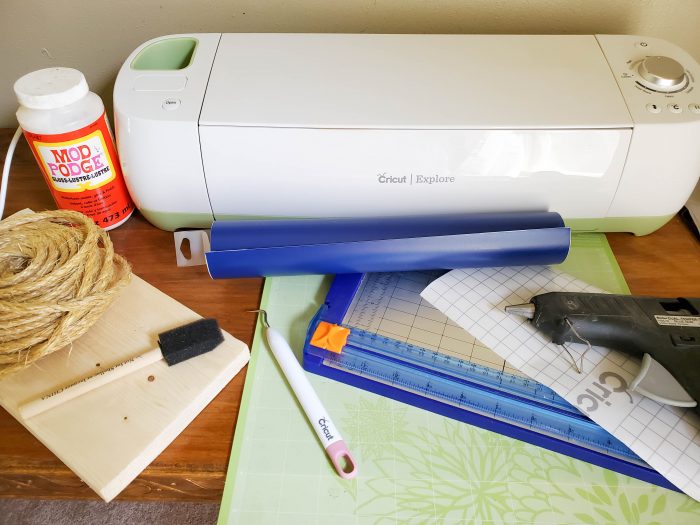
Supplies:
- Anchor SVG file
- Cricut machine with fine point blade
- Cricut Standard Grip Mat
- Cricut Premium Vinyl (a dark blue was used for this design)
- Cricut Transfer Tape
- Cricut Weeder tool
- Cricut Spatula, or thick card
- Scissors
 or paper cutter
 - 1†Foam brush
- Mod Podge
- Hot Glue gun and glue
- 6†x 12†piece of wood, sanded if needed
- 28†of rope, cut into two 14†inch pieces
 or
or 


 and glue
 , cut into two 14†inch pieces
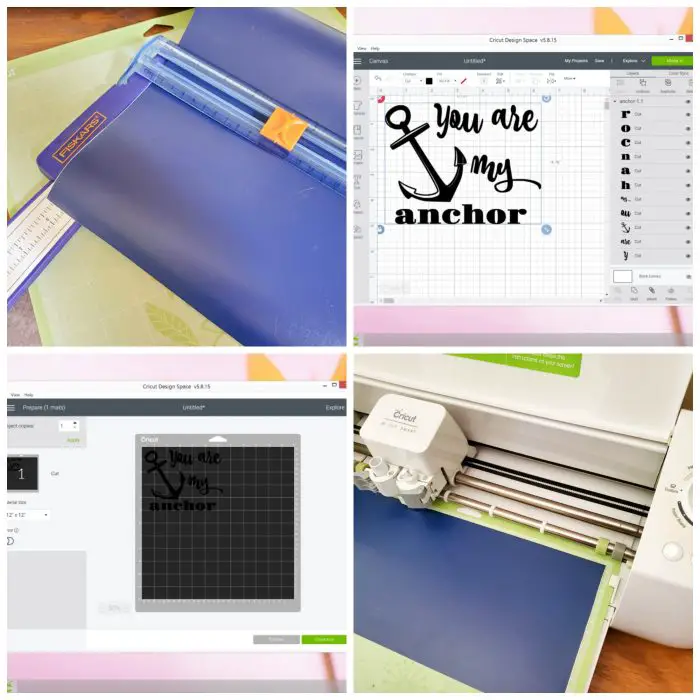
Directions for cutting the file:
- Cut and apply vinyl to Cricut Standard Grip Mat.
- Upload the Anchor SVG file into Design Space, then insert image for a new project.
- Click and drag the image into the left corner, and resize to a height of about 4.75â€.
- Click “Attach†to cut the file as a whole piece.
- Click “Make It†in Design Space, and set the material type on the machine to “Vinylâ€.
- Follow prompts to load and cut.
- Unload when finished cutting.
Directions for making the project:
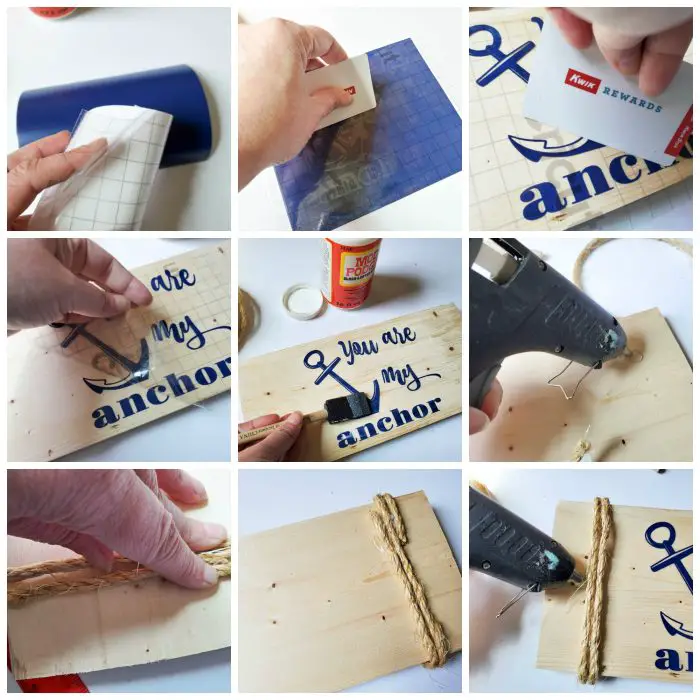
- Once design is cut, if you need to trim excess vinyl, do so now.
- Cut transfer tape to size.
- Using the weeding tool, remove all excess vinyl from design.
- Place transfer tape over design, and smooth with Cricut Spatula, or thick card.
- Center the design onto your wood, and adhere using the Cricut Spatula, or thick card.
- Using the foam brush, apply one layer or Mod Podge over your design. You can do a second coat, once the first coat is dry.
- Once that is dry, add the rope to each side of the wood, about one inch from the edge. Start by adding a generous amount of hot glue onto the back, about one inch from the top and one inch from the bottom, sticking the rope to it, then wrapping the rope around the front twice. Press down, holding the rope in place near the hot glue until it is dry.
- Repeat step 7 with the other piece of rope on the opposite side.
- You can add a dot of glue to the front, under the rope too, if needed.

