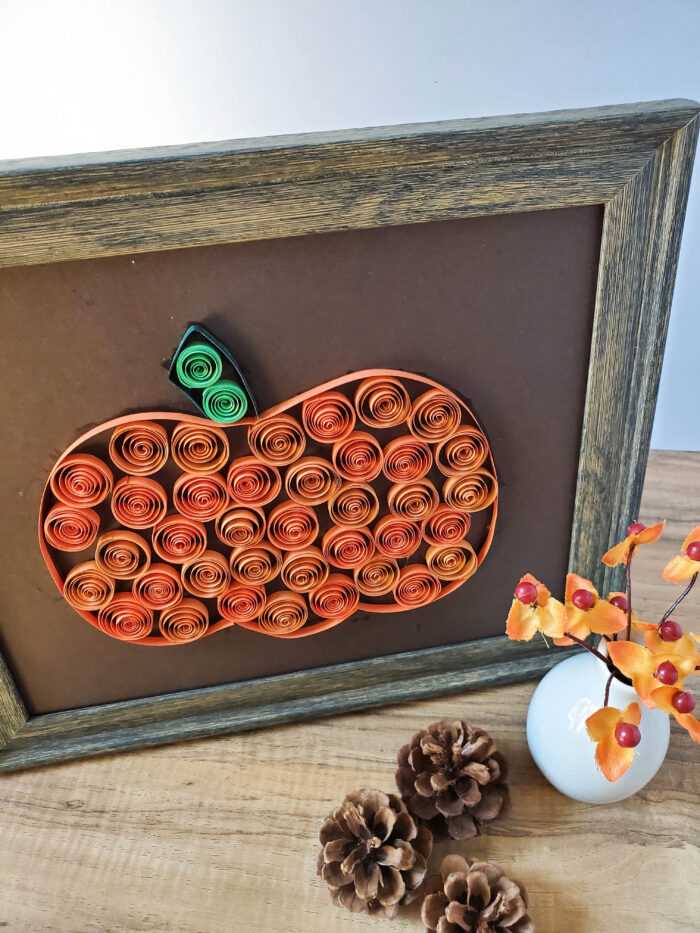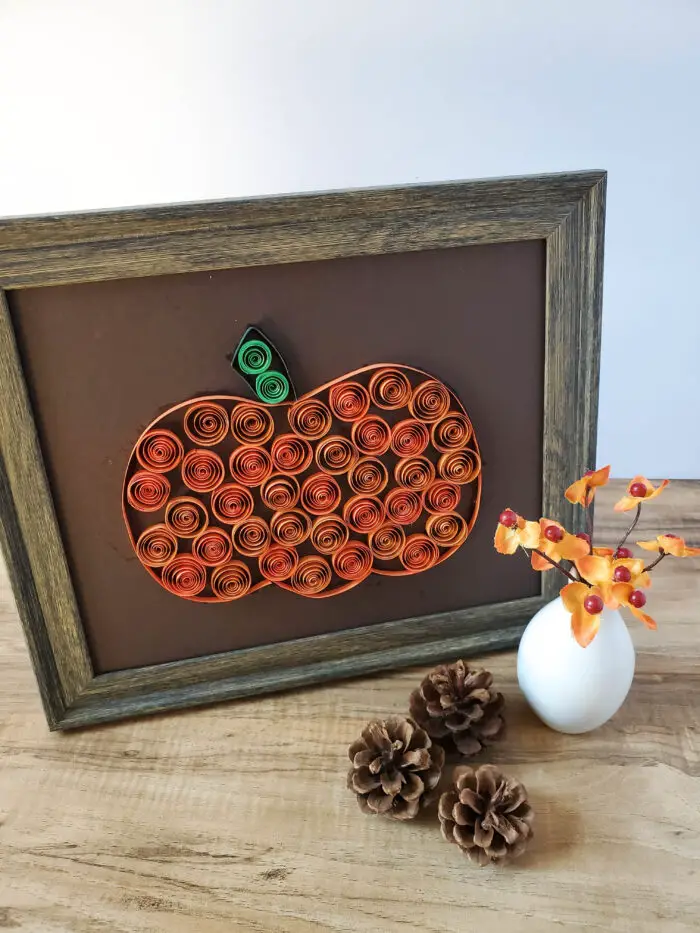
This adorable paper quilling project will give you something fun to do on a cool fall day! Making DIY home decor for the fall season has never been easier with paper quilling. This new activity helps alleviate stress while improving your mental health. Why not take a break from the stress of the real world today and create your very own pumpkin pattern quilling paper art piece?! With just a few supplies and my step-by-step tutorial below, you’ll be well on your way towards starting a new hobby that creates beautiful wall displays for use any time of the year.
What paper is best for Quilling?
I use a paper quilling project kit that’s easily purchased online. This kit comes with the best paper for quilling! You can also purchase quilling strip bundles. If you’re not ready to purchase a paper quilling kit, the beset paper for quilling is a paper that’s heavier than printer paper but lighter than cardstock. Cardstock will end up bending rather than rolling during the process of creating your quilling masterpiece. As you can see in the images, quilling projects feature an even rolling texture of paper placed in a pattern to look like a beautiful pumpkin.
You’ll want to purchase 1/8″ or 1/4″ quilling paper to make this paper quilling pumpkin project.
Can you use construction paper for Quilling?
Some people have used a high-quality kids’ construction paper option for quilling. The construction paper must be similar in measurements of the recommended 1/8″ or 1/4″ thickness as noted above. You’ll cut the high-quality construction paper into strips of paper using a paper cutter. This will ensure each of the paper quilling project strips are measured properly to avoid any imperfections with your paper quilled pumpkin design.

Is Quilling hard to learn?
I’ll be honest, when I first heard about paper quilling I was a little nervous that it would be hard to learn. I was happy to find that paper quilling is easy to learn. This type of art was rather popular during the 1970s and 80’s, then faded away to make a comeback in recent years! With a few simple tools, such as the ones you’ll receive in your paper quilling kit, you’ll be well on your way to finding out that quilling is easy to learn. I recommend watching a few simple YouTube tutorials for paper quilling before diving into this art project.
How to make a paper quilling project frame for home decor
Gather the list of supplies below and set aside some time today to relax with my paper quilling project, a beautiful fall pumpkin design!

Supplies:
- Paper Quilling Kit – specific tools used from kit: Orange paper set (3 darkest colors) and green paper set (2 darkest colors), paper quilling pen, quilling board, glue bottle (filled with Tacky craft glue), scissors, tweezers
- 8×10 photo frame
- Brown cardstock sheet, cut to 8â€x10â€
- Glue
- Pen or pencil
Notes: If you have never done paper quilling before, I recommend watching a few videos on YouTube to learn the basics. This project is pretty basic, so you should have no problem making it after watching a few beginner videos.
Directions:
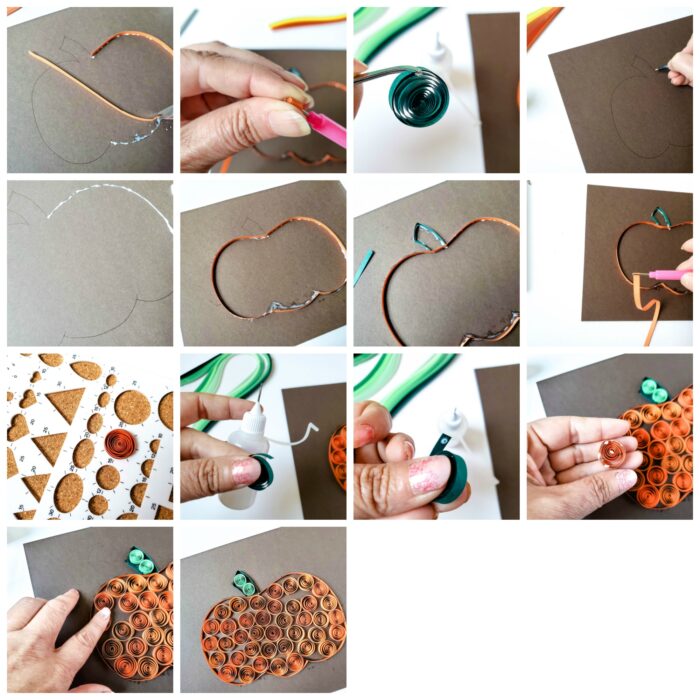
- Start by drawing your pumpkin. You can either print out a shape to trace, or just free-hand it. A pumpkin is pretty basic, so I just went with a free-hand.
- Remove the paper strips you will be using from the rest of the stack, and peel them off the glue. You will be using ALL of the 3 darkest orange colors, as well as one strip of the darkest green color, and two strips of the second darkest green color.
- Fill your glue bottle with glue, and trace your entire drawn pumpkin with a thin layer of glue.
- Take a strip of the darkest orange paper and maneuver it around the pumpkin, on the glue. You will need to cut the paper when you come to a point in the design, then start over with maneuvering over the glue. You may need to hold the paper in place for 30-60 seconds to get it to stay exactly where you want it.
- Repeat step 4 for the stem, with the darkest shade of green paper strip.